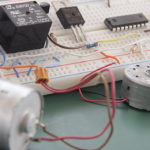
DC Motor Controller
This post is about building a simple PIC16F88 based DC motor controller. Motor speed and direction can be controlled by two push buttons SW1, SW2. One for motor speed and the other for polarity. This post follows recently published projects like PWM ...
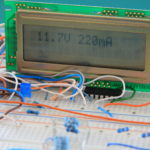
Power Supply 2.5 – 12 V
Power Supply is probably the most common electronics project you can build.This is a basic design for digital power supply. It was built around 3 main components. Digital potentiometer – MCP4251-502E/P, Low Dropout Voltage Regulator – MIC29152 and PIC16F877A.The idea ...
Arduino 4 Digit LED 7-Segment Countdown Timer
Arduino 4 Digit LED 7-Segment Countdown Timer based on Arduino MEGA will be shown in this post. For LCD version of this design follow this link. Similar project that uses PIC16F876 MCU can be found at this link. Raspberry Pi ...
Infrared UART
Wireless Infrared UART prototype can be built by using two PIC16F876A controllers. One as IR receiver with dedicated Infrared decoder like SFH505A, SFH506 or similar IR receiver IC and other microcontroller as a transmitter via IR LEDs. This is relatively simple ...
Stepper Motor Controller with Arduino
Basic Stepper Motor Controller can be built with Arduino board and a few additional components like MOSFET switches and a potentiometer to control unipolar stepper motor speed and direction. The principle of operation is relatively simple. When a potentiometer is ...
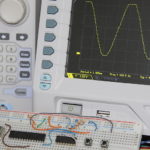
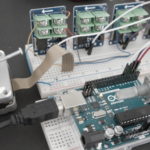
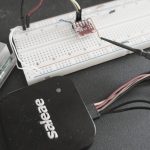
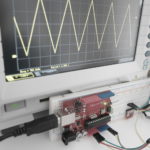
PIC Waveform Recorder
In this article I’ll show you how you can use PIC microcontroller to record and store waveform patterns in its EEPROM memory and replay the sequence later. For this purpose we’ll need a signal/waveform generator to produce the signal, PIC ...
Sine Wave with MCP4725 and Rasperry Pi
Generating Sine wave is a relatively simple task. It can be done by adding MCP4725 12bit DAC to Raspberry Pi. For Arduino version based on PCF8591 IC click this link. This setup is based on I2C interface and works by ...
Interfacing MCP4725 DAC with Arduino
In this post I’ll show you how a 12 bit DAC model MCP4725 can be connected and controlled by Arduino or a compatible board. Similar design based on Raspberry Pi platform can be found at this link . Wire.h and ...
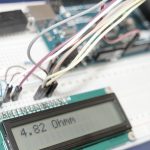
Arduino Ohm Meter
Arduino Ohm Meter is one of the simplest circuits that can be built with minimal number of required components. As can be seen from design schematic a standard 2x16 LCD display and 3 resistors are all you need to complete ...
BCD to 7 Segment Display Decoder
In this post I'll show how you can drive 7 Segment LED display with PIC16F876A. Instead of using a dedicated IC’s like 4511 we’ll program the micro controller to convert BCD input code 0 – 9 to a 7 Segment LED ...